Peplink MAX routers allow you to configure 3 user groups with independent upload and download limits. The groups are named “Manager,” “Staff,” and “Guest.” While these names are fixed, you can assign any devices on your network to these groups. The “Manager” group has no bandwidth limits, providing full access to total bandwidth, whereas the “Staff” and “Guest” groups can be configured to limit bandwidth usage.
Using bandwidth groups helps control the amount of bandwidth certain devices consume, ensuring that a few devices don’t use up all available bandwidth. This is especially useful for limiting high-bandwidth applications, like streaming services. For instance, Netflix can use 20-30 Mbps for 4K videos, but can also stream well at 5 Mbps for standard definition videos. By capping the bandwidth for Netflix, you can prevent 4K streaming and reduce your cellular bandwidth usage, cutting down on monthly costs.
Step 1 – Set Up Bandwidth Group Limits
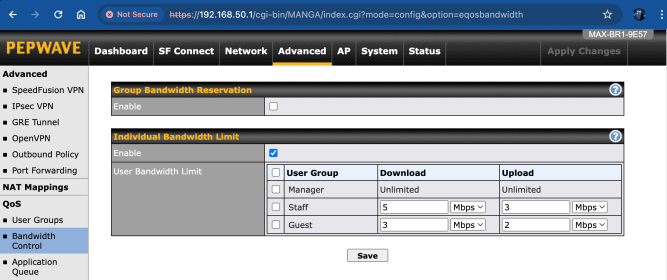
First, decide on the bandwidth limits for each group. You might want to create one group with moderate limits and another with stricter limits. Note that setting less than 3 Mbps download and 1 Mbps upload may affect general usability.
To set bandwidth limits:
- Access the Peplink MAX admin panel at http://192.168.50.1.
- Go to the “Advanced” tab, then the “QoS” section, and select “Bandwidth Control.”
- In the “Individual Bandwidth Limit” section, check “enable.”
- Enter the download and upload limits for each group.
- Click “save,” then “Apply Changes” to finalize.
Step 2 – Assign Devices to Bandwidth Groups
You can add devices to bandwidth groups in three ways:
Method 1: Assign Individual Devices by IP Address
- Identify the device’s IP address from the “Client List” under the “Status” tab.
- Click the “tag” icon to create a DHCP Reservation, ensuring the device always uses the same IP address. You’ll need to click “Save” at the bottom of the DHCP reservation window, then “Apply Changes” at the top right.

- Navigate to the “Advanced” tab, then “User Groups.”
- Click “New Rule,” enter the device’s IP address, and select the desired bandwidth group. The “Manager” group bypasses all limits.
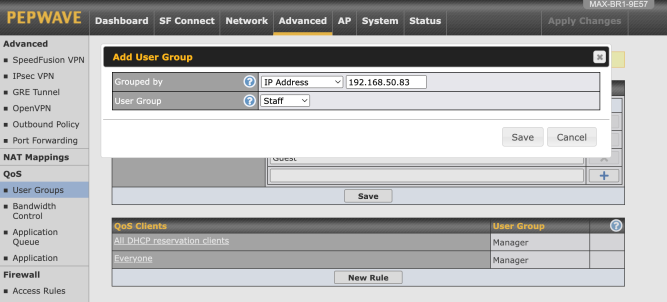
- Click “Save,” then “Apply Changes.” You should then see your rule listed with the default ones, like shown below.

Method 2: Assign Network VLAN Segments & Set WiFi Access
- Create a new VLAN by going to the “Network” tab and clicking “New LAN.”

- Set up the network with the following settings:
- IP Address: 192.168.10.1
- Name: Give this a unique name to identify it easily
- VLAN ID: 2 (this must be different than any other LANs)
- IP Range: Set a range of addresses that will be made available for your devices to establish a connection to the network
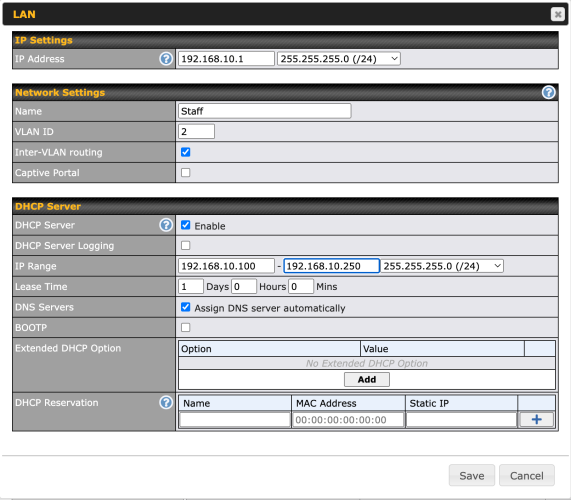
- Click “Save” and then “Apply Changes.”
- Navigate to the “AP” tab
- Create a new wireless network by clicking on “New SSID” – this will be linked to the VLAN created earlier:
- SSID: Name the WiFi network for users to connect to
- VLAN: Select the VLAN you created earlier.
- Security policy: We recommend setting this to WPA2 Personal or WPA2/WPA3 Personal
- Shared key: This is your WiFi password, which needs to be at least 8 characters
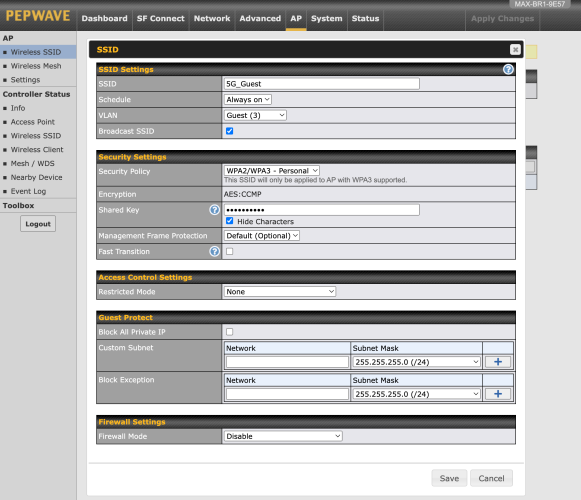
- Click “Save,” then ”Apply Changes”
To assign the VLAN to a user group:
- Go to the “Advanced” tab, then “User Groups.”
- Click “New Rule” and select “Group by Subnet.”
- Enter the subnet, ensuring it ends in 0 to cover the entire network.

- When done, click “Save,” then “Apply Changes”
Method 3: Using Client Type
You can also group devices by type, such as printers, to restrict their bandwidth usage.
- Navigate to the “Advanced” tab, then “User Groups.”
- Click “New Rule,” and set the “Grouped by” field to “Client Type” and select the desired type.
- Set the desired “User Group” this should apply to.
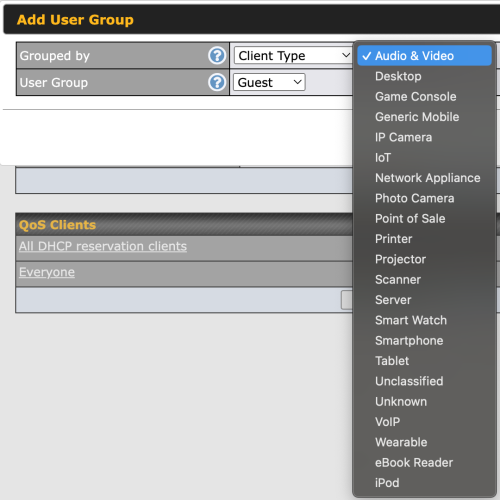
- Click “Save,” then “Apply Changes.”
Step 3 – Test Bandwidth Group
Wait 60 seconds for the router to reboot. Connect devices to the new WiFi network and test to ensure the bandwidth limits are applied. Repeat the process to create additional networks and assign them to different bandwidth groups as needed.
Conclusion
By leveraging the bandwidth user group features on Peplink MAX routers, you can efficiently manage and optimize your network’s bandwidth usage. Configuring these groups allows you to prioritize essential devices and applications while restricting high-bandwidth activities to prevent network congestion. This approach not only enhances overall network performance but also helps reduce unnecessary data consumption, leading to cost savings. Whether you are setting up limits for individual devices, entire VLAN segments, or specific client types, these methods provide flexibility and control to meet your unique network needs. Implementing these strategies ensures a balanced and efficient use of your network resources, contributing to a smoother and more reliable internet experience for all users.

