Accessing your local devices remotely without port forwarding or router changes
What is CG-NAT?
CG-NAT is a network address translation technique that extends the IPv4 networks on a considerable scale and allows ISPs (internet service providers) to conserve their acquired public IPv4 pool. Every online user has two IP addresses, a public (eg. 83.24.73.243) and a private one (eg. 192.168.1.12.) When a user intends to communicate online, the standard NAT protocol translates their private IPv4 address to a public one. But with CGNAT (LSN or NAT 444), an extra layer of address translation is added. The unique private IP addresses are translated into public IPs shared by multiple users. And this is how ISPs prevent their public IPv4 pool from exhaustion.
What does that mean exactly for me?
While it is excellent from a security standpoint and is great for cellular ISPs it can be frustrating from a network operations standpoint when attempting to reach equipment inside a private network behind a cellular router. Typically how this is dealt with is to buy the use of one of the ISPs static public facing IP addresses that by-passes their internal IPv4 CG-NAT for a direct line of sight to the internet. This of course costs more money which the average home or small business user doesn’t want to deal with. This is where a Reverse Proxy comes into play.
What is a reverse Proxy?
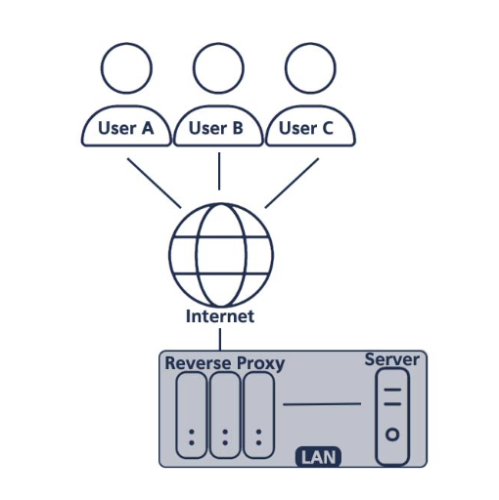
A reverse proxy is a server that sits in front of web servers and forwards client (e.g. web browser) requests to those web servers. Reverse proxies are typically implemented to help increase security, performance, and reliability.

How could this benefit me?
Normally with CG-NAT traditional port forwarding won’t work like it would on a landline based ISP (eg. Cable, DSL, Fiber) since you are behind the cellular carriers NAT. This is a work around to this issue.
Here are a few use cases for a reverse proxy that would make it attractive to an average user. (Note: Prerequisite for these scenarios is a PC will be required; It can be just a little Raspberry Pi or other PC. I used a Raspberry Pi 4 and a service called LocalXpose for all of these instances.)
Scenarios
A. I need to see a camera at a remote location on a cellular router.
B. I have T-Mobile home internet but want to access my Plex Server remotely.
Scenario A – Remote Camera exposure:
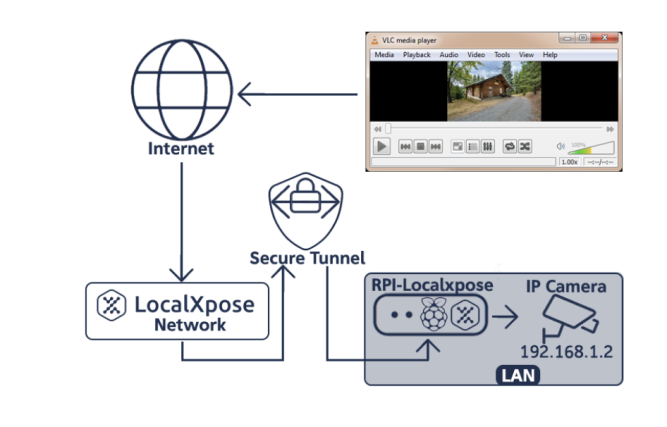
I have an IP camera mounted at a remote cabin connected to a cellular router in the woods. I want to be able to see the video feed from my home. We find the local LAN ip address of your IP camera, in this example I’m going to use 192.168.1.2. Once I know my camera’s IP address I test the feed with VLC Player I open the feed url (rtsp://username:password@192.168.1.2:554) and I see a live feed of the camera. I then jump over to my PC with LocalXpose installed on it. In my case I’m using Linux for the operating System. I use the following command to route my camera feed to one of localxpose’s external URLs:
./loclx tunnel tcp –port 10554 –to 192.168.1.2:554
This will create a url similar to us.loclx.io:10554. We can plug this URL into VLC player on a computer outside the network (in this case at our home) like so:
rtsp://username:password@camera.loclx.io:10554 and we will see the same live feed we did as if we were on the local network.

Scenario B – Plex Server exposure
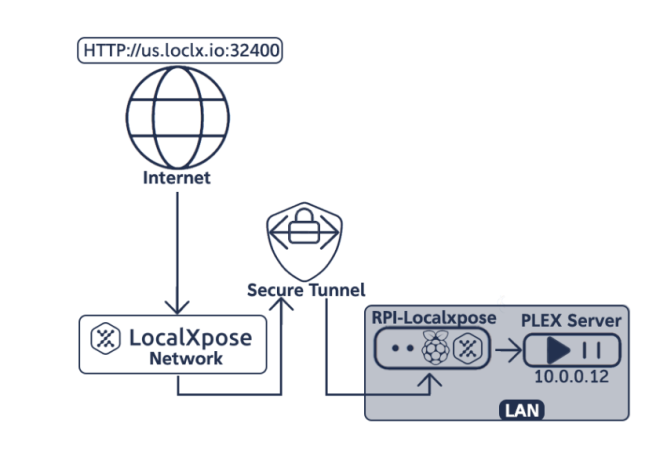
This is a similar scenario as with the camera except we are dealing with a different type of device. Plex is an application for sharing media locally (eg. Home videos or music libraries.) In my case I have T-Mobile Home Internet but I want to be able to access my Plex library from outside my local LAN. Much the same way I did with the camera setup, I first get the IP address and port number the Plex server uses (I’m going to use the default port in this case.) My Plex server has an IP address of 10.0.0.12 and the port is 32400. Normally at home I put http://10.0.0.12:32400 into my web browser on my PC and I’m greeted with the login screen for my plex server. Again just like the camera we use a command to forward the traffic but I also want to specify the port:
./loclx tunnel tcp –port 32400 –to 10.0.0.12:32400
This will generate a url similar to this: http://us.loclx.io:32400. We can now put this URL into the browser of a PC (or phone/tablet) outside our home network and access the media on our Plex server.

As you can see in these two examples, a reverse proxy can be extremely useful when you’re behind the bars, so to speak of CG-NAT. I would also like to note that I didn’t go into the fine grain details of using this particular service as it was my goal to give a general example of how it could be used in a compact short read.
If you’re interested in us going into more detail about this type of service, email sales@5gstore.com.
April 13, 2023 By: David W.

