To comprehend port forwarding, you must first grasp the basics of how data flows across the internet. Every device connected to the internet, be it a computer, smartphone, or server, has an Internet Protocol (IP) address assigned to it. This unique numerical identifier serves as the device’s “address” on the internet, allowing it to send and receive data.
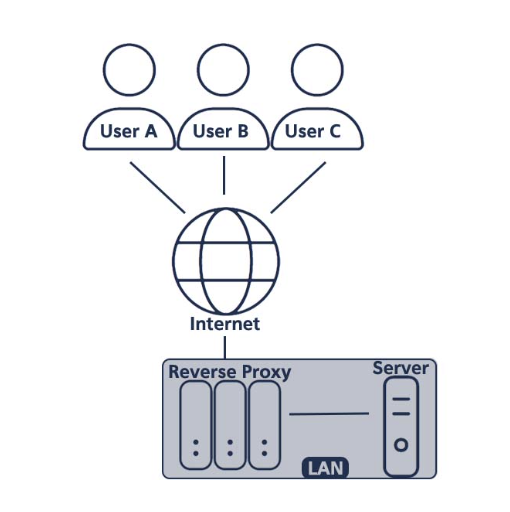
Now, imagine you have set up a network attached storage (NAS) device with important files or a server at home to host a website. In such cases, your home network router plays a crucial role. It acts as a gateway, connecting your private network to the internet. When data is sent to your public IP address (assigned by your Internet Service Provider (ISP)), the router must decide how to handle it.
This is where port forwarding comes into play. Ports are like virtual “doors” on your device, allowing specific types of data to enter or exit. When data is sent to a specific port on your public IP address, the router must forward it to the correct device on your private network. Without port forwarding, incoming data would be blocked, and your server or application would be inaccessible from the internet.
Now, let’s examine the different aspects of IP addresses that influence port forwarding: private versus public, and dynamic versus static.
Private IP addresses
Private IP addresses are used within local networks (such as your home or office) to identify devices. However, they are also typically provided by cellular Internet service providers like Verizon, AT&T and T-Mobile. They are non-routable on the public internet, meaning they cannot be accessed directly from outside the local network. Instead, private IP addresses are translated into public IP addresses through Network Address Translation (NAT) when communicating with the internet.
Examples of private IPv4 address ranges are: 10.0.0.0 to 10.255.255.255, 172.16.0.0 to 172.31.255.255, 192.168.0.0 to 192.168.255.255.
For port forwarding to work, you need to configure your router to map incoming requests on specific ports of your public IP address to the corresponding ports on your private IP address. This allows external users to access your server or application running on a device within your local network.
Unfortunately, when working with a private IP address from your service provider, there is no work around with port forwarding. Cloud based applications and remote access applications are going to be the best options for accessing devices behind a privately assigned IP address. Examples include Peplink’s InControl 2, Cradlepoint’s NetCloud Manager, TeamViewer and Remote Desktop.
Public IP addresses
Public IP addresses are typically assigned by wired ISPs (i.e. cable, DSL, fiber) and are unique on the internet. They allow your devices to communicate with other devices across the globe. When data is sent to your public IP address, your router determines how to handle it based on the port forwarding configurations. Public IP addresses can be either dynamic or static, which affects the reliability and accessibility of your services.
Dynamic IP addresses
Dynamic IP addresses change periodically. Each time your router reconnects to your ISP, it may be assigned a different IP address. Dynamic IP addresses are cost-effective for ISPs as they can allocate a limited number of public IP addresses among many customers.
Dynamic IP addresses can pose a challenge for port forwarding because if your public IP address changes, the forwarding rules you have set up become invalid. To ensure your server or application remains accessible, you can either manually update the port forwarding settings or use dynamic DNS services that map a domain name to your changing IP address.
Static IP addresses
Static IP addresses, as the name suggests, remain constant. They are manually assigned to a device and do not change even if you reconnect to your ISP. Static IP addresses are typically offered as a premium service by ISPs or businesses that require consistent accessibility.
Having a static IP address simplifies port forwarding because you don’t need to worry about IP address changes. The forwarding rules remain intact, ensuring reliable and continuous access to your server or application.
Port Forwarding Setup
Now that you understand the differences between IP address types, we’ll take a look at how port forwarding is set up. First, you must know the local, private IP address of the device you need access to on your home or office network. In order to ensure this address does not change, it should be reserved on the router or set statically at the device’s settings.
Next, verify the port(s) the device listens on, along with the protocol type (i.e. UDP or TCP or both). If the device uses the common ports of 80 (HTTP) or 443 (HTTPS), chances are that your ISP may be blocking them. In this case, you will need to forward these to a different port for your remote access. For example, port 8080 or 8443 can be used. In other cases, you may simply need to set rules to open certain ports. In this case the port forward rule is set for the same local and remote access ports.
Before you test your remote access, confirm you can access your device locally using the port(s) in your forwarding rule(s). As long as it works this way, you can then proceed to test remotely. Connect to a different network and open a browser or application, depending on what you are needing to access. Enter the ISP provided IP address along with the port you set for remote access. For example: http://166.166.166.166:8080 – this would be accessible via a web browser, but in some cases you might use an application you enter the IP and port information into.
Looking for more information on how to set up port forwarding? Check out our videos below:
- Cradlepoint https://www.youtube.com/watch?v=Bk6jG_AMH2c
- Sierra Wireless https://www.youtube.com/watch?v=uw2enbA57eI
- Sierra Wireless AirLink OS https://www.youtube.com/watch?v=6XOuNGZM1ak
- Digi https://www.youtube.com/watch?v=afgZYFcsS-4
- Inseego https://www.youtube.com/watch?v=Oiktf5haRDw&t=125s
- Peplink https://www.youtube.com/watch?v=3i_4d2x7Oq8