Transforming Networks with Digi Remote Manager

In the ever-evolving landscape of network management, Digi Remote Manager (Digi RM) stands out as a transformative technology platform that takes networks to the next level, enabling smarter operations for both networks and the individuals tasked with managing them. By seamlessly bringing together a myriad of dispersed Internet of Things (IoT) devices, Digi RM evolves them into a dynamic, intelligent network. 

Features of Digi Remote Manager

1. Effortless Device Management

Digi RM simplifies the configuration, deployment, monitoring, and management of hundreds or even thousands of mission-critical devices from a single point of command. The platform’s exclusive drag-and-drop grouping technology facilitates the auto-assimilation, updating, and deployment of devices with ease.

2. Insightful Dashboard and Reporting

The flexible Digi RM dashboard allows users to customize and position crucial information as needed. Pre-built reports with critical device health metrics can be tailored to include specific data, and alerts can be configured for specified conditions. This allows for a deeper understanding of network performance and facilitates informed decision-making.

3. Security and Compliance

Digi RM ensures an always-on, always-secure network with software-defined protection. It automatically scans and fixes any out-of-compliance device configurations in the group, maintaining the integrity of the network and alerting administrators if key settings deviate.

4. Cloud Integration

Digi RM provides pre-configured APIs that streamline the access, connection, and analysis of data collected from devices. Cloud connectors enable seamless integration with third-party analytics and visualization dashboard applications. For custom integrations, the platform offers a rich web service API.

5. Digi Containers

Digi Containers, an add-on service to Digi Remote Manager, simplifies the deployment of custom applications via containers. These containers streamline the process of building, deploying, and running custom applications on devices managed with Digi RM. Lightweight Linux Containers (LXC) tools enable developers to package custom applications, complete with dependencies, into a portable bundle.

6. WAN Bonding

Digi WAN Bonding combines multiple connections into a resilient connectivity solution, ensuring optimal performance and maximum uptime globally. Features such as Digi SureLink®, policy-based routing, and interface bonding prevent external network failures from causing downtime, providing a robust and reliable network connection.

7. Mobile VPN

Digi Mobile VPN offers a secure connection between data centers and Digi routers, including connected edge devices. Orchestrated through Digi Remote Manager, this service provides persistent, secure connectivity—a crucial feature for applications in public sectors, emergency response, and mass transit.

8. Digi Remote Manager Mobile App

The Digi RM mobile app enhances user convenience by enabling device registration via QR codes. The Configuration Manager feature allows for the automatic application of custom configurations. Users can monitor the overall health of their network and individual device statuses through the app.

5Gstore’s Utilization of Digi Remote Manager

5Gstore harnesses the power of Digi Remote Manager across various aspects of network management.

  • Configuration Management
    • 5Gstore utilizes Digi RM’s Configuration Manager for both individual devices and bulk configurations, streamlining the process of setting up and managing devices across the network.
  • Firmware Management
    • Digi RM facilitates firmware management for 5Gstore, allowing them to update firmware on individual devices or in bulk, ensuring that all devices are running the latest and most secure versions.
  • Monitoring Data Usage
    • Leveraging Digi IntelliFlow, a key feature of Digi Remote Manager, 5Gstore actively monitors data usage via alarms and network traffic visualization tools. This provides actionable insights into the network’s application data, focusing on the top 10 users or destinations.
  • WAN Bonding for Network Redundancy
    • 5Gstore employs Digi WAN Bonding to achieve resilient connectivity and maximum performance across multiple connections. This ensures that our employees’ networks remain robust and operational even in the face of connection failures.

In conclusion, Digi Remote Manager serves as a cornerstone in modern network management, empowering organizations like 5Gstore to achieve efficiency, security, and resilience in their networks. As technology continues to advance, Digi RM remains at the forefront, providing a comprehensive solution for managing the complexities of IoT devices and ensuring the seamless operation of intelligent networks.

Accessing Peplink Cloud Services from Private Networks

Peplink routers are renowned for their robust connectivity solutions, and for users venturing into private APNs, it’s essential to configure firewall rules to ensure seamless access to Peplink services. This guide outlines the steps to modify inbound and outbound firewall rules on the APN firewall/gateway, allowing a clear path for Peplink services to function efficiently. Those services include:

  • InControl
  • SpeedFusion Connect
  • Remote Web Admin access & InTouch services
  • Remote Access (for Peplink support)
  • Push Notification services (for the Router Utility app)
  • Automatic firmware check in

Here’s a guide to configuring firewall rules for specific Peplink services:

Refer to this JSON file for details on the services. Find the corresponding section where “system” refers to the service you require. 

For example, if you want to allow the InControl service, you’ll need to set up firewall rules to allow for the following:

  • Host Names*: ac1.peplink.com and ac2.peplink.com
  • Port: UDP 5246

*If specific IP addresses are required, the list is provided as well.

Configuring firewall rules for Peplink routers on private cellular networks is crucial to ensure uninterrupted access to essential services. By following these detailed steps for each specific service, users can optimize their Peplink experience while maintaining the security and integrity of their private APN connections. Stay connected with confidence using Peplink routers on your private cellular network.

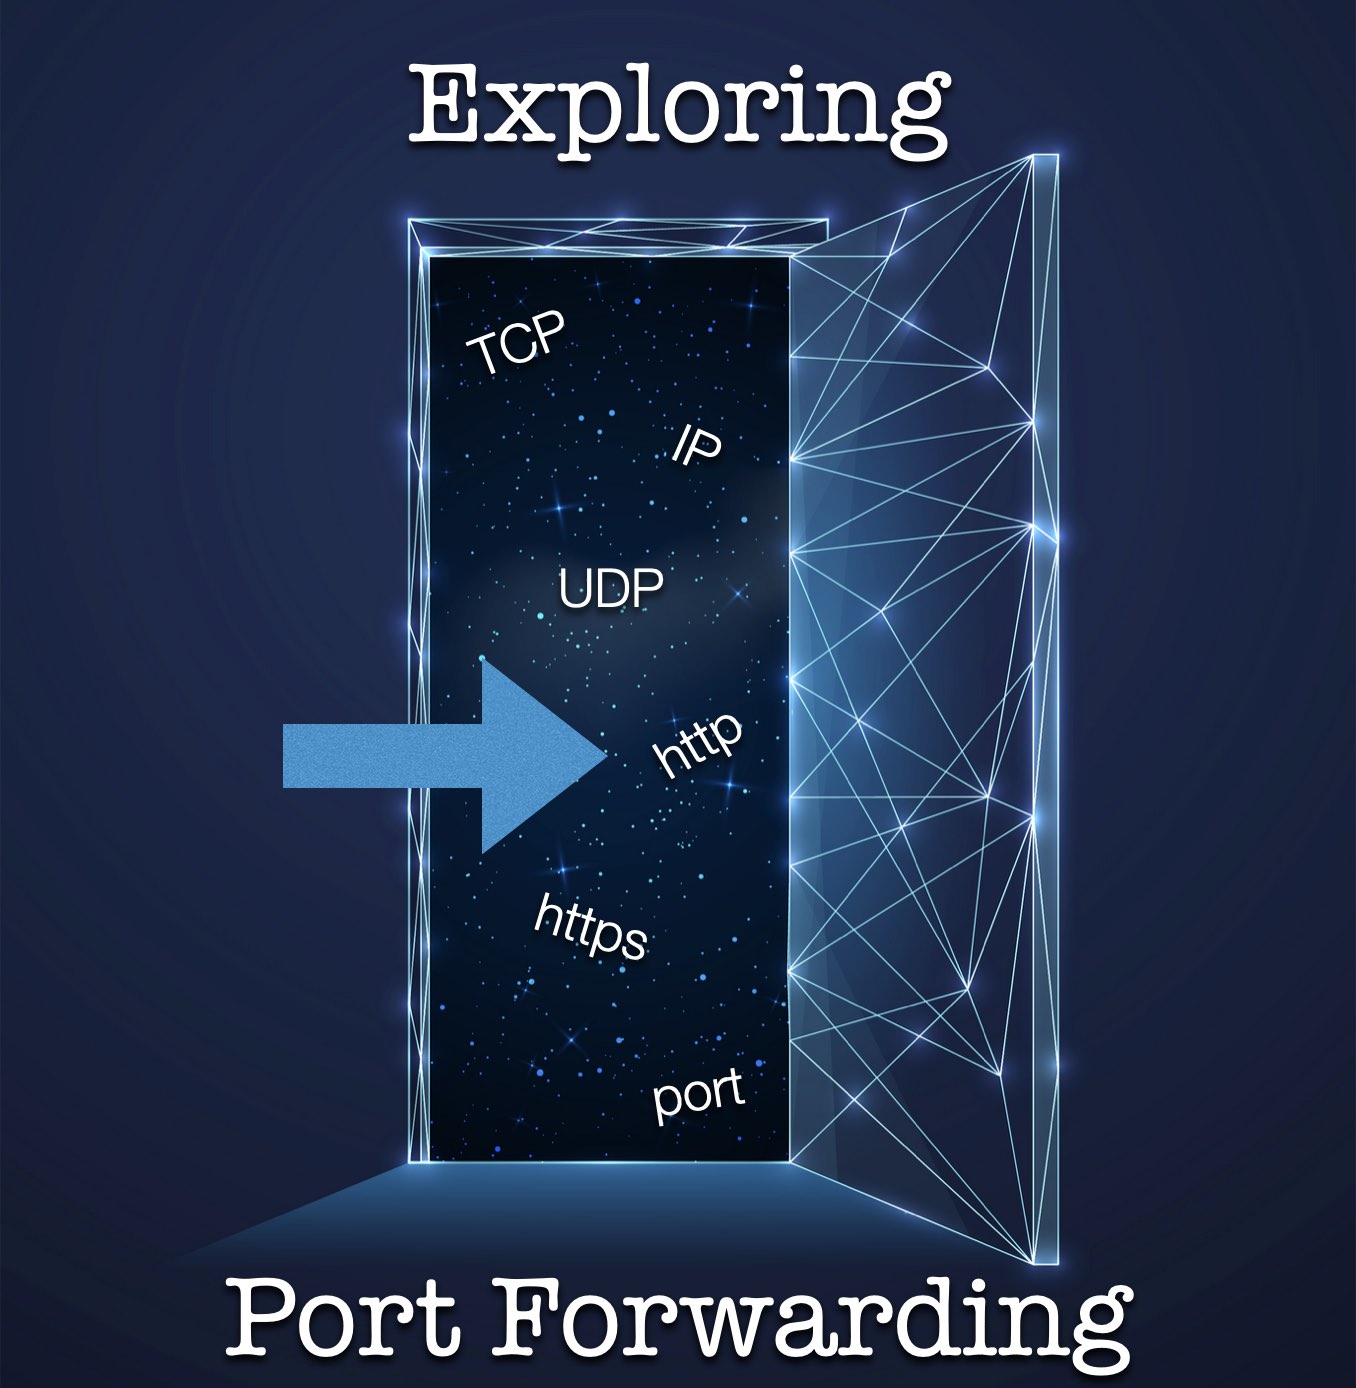
Exploring Port Forwarding

To comprehend port forwarding, you must first grasp the basics of how data flows across the internet. Every device connected to the internet, be it a computer, smartphone, or server, has an Internet Protocol (IP) address assigned to it. This unique numerical identifier serves as the device’s “address” on the internet, allowing it to send and receive data.

Now, imagine you have set up a network attached storage (NAS) device with important files or a server at home to host a website. In such cases, your home network router plays a crucial role. It acts as a gateway, connecting your private network to the internet. When data is sent to your public IP address (assigned by your Internet Service Provider (ISP)), the router must decide how to handle it.

This is where port forwarding comes into play. Ports are like virtual “doors” on your device, allowing specific types of data to enter or exit. When data is sent to a specific port on your public IP address, the router must forward it to the correct device on your private network. Without port forwarding, incoming data would be blocked, and your server or application would be inaccessible from the internet.

Now, let’s examine the different aspects of IP addresses that influence port forwarding: private versus public, and dynamic versus static.

Private IP addresses

Private IP addresses are used within local networks (such as your home or office) to identify devices. However, they are also typically provided by cellular Internet service providers like Verizon, AT&T and T-Mobile. They are non-routable on the public internet, meaning they cannot be accessed directly from outside the local network. Instead, private IP addresses are translated into public IP addresses through Network Address Translation (NAT) when communicating with the internet.

Examples of private IPv4 address ranges are: 10.0.0.0 to 10.255.255.255, 172.16.0.0 to 172.31.255.255, 192.168.0.0 to 192.168.255.255.

For port forwarding to work, you need to configure your router to map incoming requests on specific ports of your public IP address to the corresponding ports on your private IP address. This allows external users to access your server or application running on a device within your local network. 

Unfortunately, when working with a private IP address from your service provider, there is no work around with port forwarding. Cloud based applications and remote access applications are going to be the best options for accessing devices behind a privately assigned IP address. Examples include Peplink’s InControl 2, Cradlepoint’s NetCloud Manager, TeamViewer and Remote Desktop.

Public IP addresses

Public IP addresses are typically assigned by wired ISPs (i.e. cable, DSL, fiber) and are unique on the internet. They allow your devices to communicate with other devices across the globe. When data is sent to your public IP address, your router determines how to handle it based on the port forwarding configurations. Public IP addresses can be either dynamic or static, which affects the reliability and accessibility of your services.

Dynamic IP addresses

Dynamic IP addresses change periodically. Each time your router reconnects to your ISP, it may be assigned a different IP address. Dynamic IP addresses are cost-effective for ISPs as they can allocate a limited number of public IP addresses among many customers.

Dynamic IP addresses can pose a challenge for port forwarding because if your public IP address changes, the forwarding rules you have set up become invalid. To ensure your server or application remains accessible, you can either manually update the port forwarding settings or use dynamic DNS services that map a domain name to your changing IP address.

Static IP addresses

Static IP addresses, as the name suggests, remain constant. They are manually assigned to a device and do not change even if you reconnect to your ISP. Static IP addresses are typically offered as a premium service by ISPs or businesses that require consistent accessibility.

Having a static IP address simplifies port forwarding because you don’t need to worry about IP address changes. The forwarding rules remain intact, ensuring reliable and continuous access to your server or application.

Port Forwarding Setup

Now that you understand the differences between IP address types, we’ll take a look at how port forwarding is set up. First, you must know the local, private IP address of the device you need access to on your home or office network. In order to ensure this address does not change, it should be reserved on the router or set statically at the device’s settings. 

Next, verify the port(s) the device listens on, along with the protocol type (i.e. UDP or TCP or both). If the device uses the common ports of 80 (HTTP) or 443 (HTTPS), chances are that your ISP may be blocking them. In this case, you will need to forward these to a different port for your remote access. For example, port 8080 or 8443 can be used. In other cases, you may simply need to set rules to open certain ports. In this case the port forward rule is set for the same local and remote access ports. 

Before you test your remote access, confirm you can access your device locally using the port(s) in your forwarding rule(s). As long as it works this way, you can then proceed to test remotely. Connect to a different network and open a browser or application, depending on what you are needing to access. Enter the ISP provided IP address along with the port you set for remote access. For example: http://166.166.166.166:8080 – this would be accessible via a web browser, but in some cases you might use an application you enter the IP and port information into. 

Looking for more information on how to set up port forwarding? Check out our videos below:

By-passing a Cellular Carriers Network without a static IP address

Accessing your local devices remotely without port forwarding or router changes

What is CG-NAT?

CG-NAT is a network address translation technique that extends the IPv4 networks on a considerable scale and allows ISPs (internet service providers) to conserve their acquired public IPv4 pool. Every online user has two IP addresses, a public (eg. 83.24.73.243) and a private one (eg. 192.168.1.12.) When a user intends to communicate online, the standard NAT protocol translates their private IPv4 address to a public one. But with CGNAT (LSN or NAT 444), an extra layer of address translation is added. The unique private IP addresses are translated into public IPs shared by multiple users. And this is how ISPs prevent their public IPv4 pool from exhaustion.

What does that mean exactly for me?

While it is excellent from a security standpoint and is great for cellular ISPs it can be frustrating from a network operations standpoint when attempting to reach equipment inside a private network behind a cellular router. Typically how this is dealt with is to buy the use of one of the ISPs static public facing IP addresses that by-passes their internal IPv4 CG-NAT for a direct line of sight to the internet. This of course costs more money which the average home or small business user doesn’t want to deal with. This is where a Reverse Proxy comes into play.

What is a reverse Proxy?

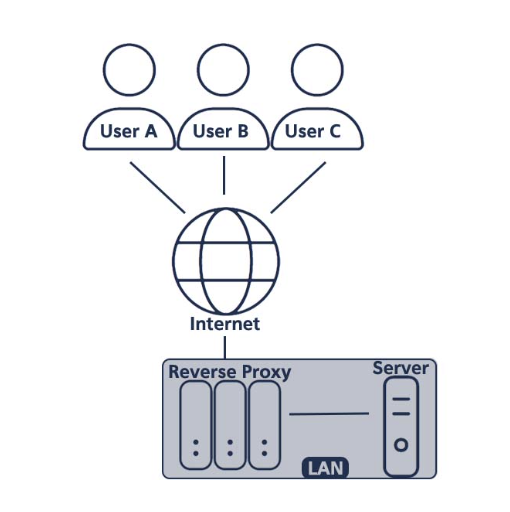
A reverse proxy is a server that sits in front of web servers and forwards client (e.g. web browser) requests to those web servers. Reverse proxies are typically implemented to help increase security, performance, and reliability.

How could this benefit me? 

Normally with CG-NAT traditional port forwarding won’t work like it would on a landline based  ISP (eg. Cable, DSL, Fiber) since you are behind the cellular carriers NAT. This is a work around to this issue.

Here are a few use cases for a reverse proxy that would make it attractive to an average user. (Note: Prerequisite for these scenarios is a PC will be required; It can be just a little Raspberry Pi or other PC. I used a Raspberry Pi 4 and a service called LocalXpose for all of these instances.)

Scenarios

A. I need to see a camera at a remote location on a cellular router.

B. I have T-Mobile home internet but want to access my Plex Server remotely.


Scenario A – Remote Camera exposure: 

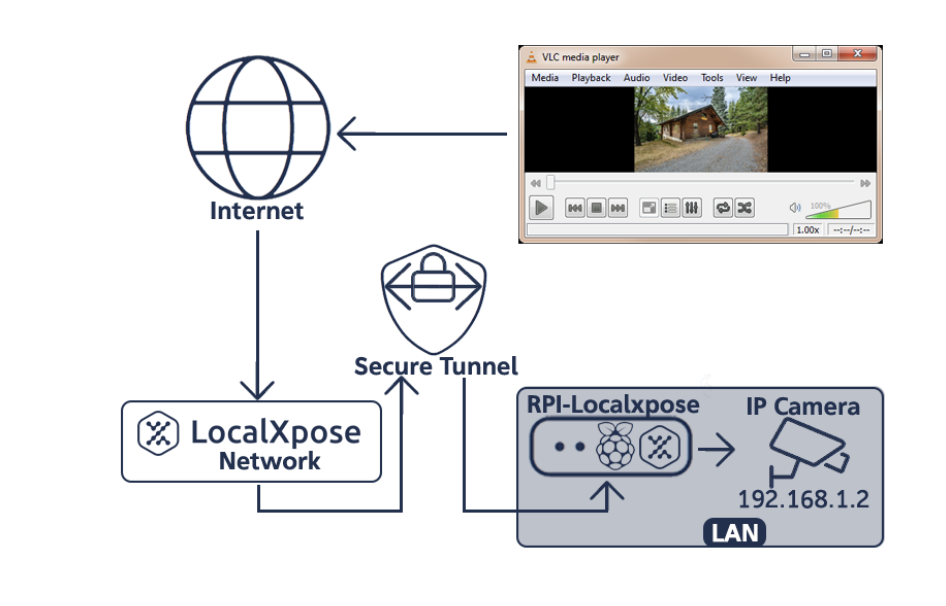
I have an IP camera mounted at a remote cabin connected to a cellular router in the woods. I want to be able to see the video feed from my home. We find the local LAN ip address of your IP camera, in this example I’m going to use 192.168.1.2. Once I know my camera’s IP address I test the feed with VLC Player I open the feed url (rtsp://username:password@192.168.1.2:554) and I see a live feed of the camera. I then jump over to my PC with LocalXpose installed on it. In my case I’m using Linux for the operating System. I use the following command to route my camera feed to one of localxpose’s external URLs:

./loclx tunnel tcp  –port 10554 –to 192.168.1.2:554

This will create a url similar to us.loclx.io:10554. We can plug this URL into VLC player on a computer outside the network (in this case at our home) like so:

rtsp://username:password@camera.loclx.io:10554 and we will see the same live feed we did as if we were on the local network.

Scenario B – Plex Server exposure

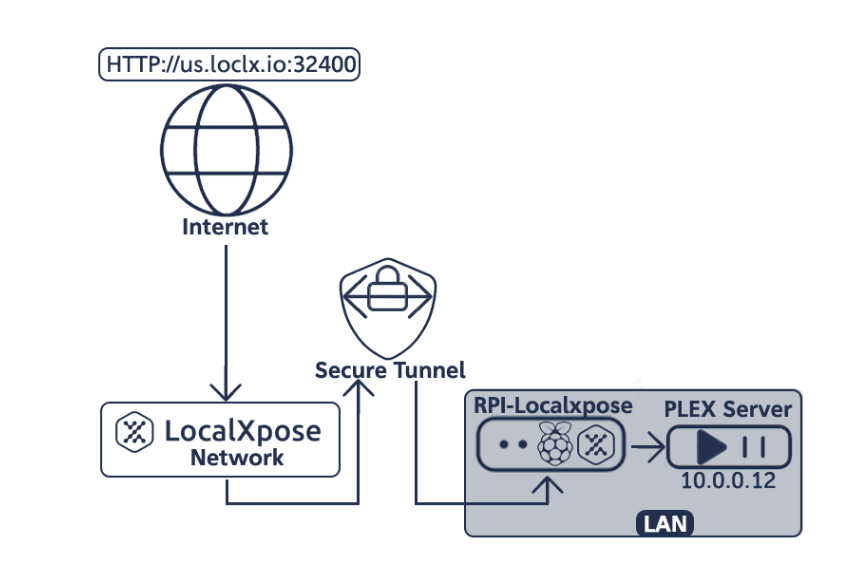
This is a similar scenario as with the camera except we are dealing with a different type of device. Plex is an application for sharing media locally (eg. Home videos or music libraries.) In my case I have T-Mobile Home Internet but I want to be able to access my Plex library from outside my local LAN. Much the same way I did with the camera setup, I first get the IP address and port number the Plex server uses (I’m going to use the default port in this case.) My Plex server has an IP address of 10.0.0.12 and the port is 32400. Normally at home I put http://10.0.0.12:32400 into my web browser on my PC and I’m greeted with the login screen for my plex server. Again just like the camera we use a command to forward the traffic but I also want to specify the port:

./loclx tunnel tcp –port 32400 –to 10.0.0.12:32400

This will generate a url similar to this: http://us.loclx.io:32400. We can now put this URL into the browser of a PC (or phone/tablet) outside our home network and access the media on our Plex server.

As you can see in these two examples, a reverse proxy can be extremely useful when you’re behind the bars, so to speak of CG-NAT. I would also like to note that I didn’t go into the fine grain details of using this particular service as it was my goal to give a general example of how it could be used in a compact short read. 

If you’re interested in us going into more detail about this type of service, email sales@5gstore.com.

April 13, 2023 By: David W.